Pottery Barn Inspired Décor, Dollar Store Price
#DIYThursday
Pottery Barn Inspired Décor, Dollar Store Price
I love Pottery Barn, but my wallet doesn’t. I’ve come to the conclusion that until I finally win the lotto (it’s coming, I can feel it), my time spent perusing their stores will be just that… perusing. Not to be confused with purchasing. Maybe you’ve seen Pottery Barn make a special appearance in our Instagram Stories. The retailer really does hold a special place in my heart.
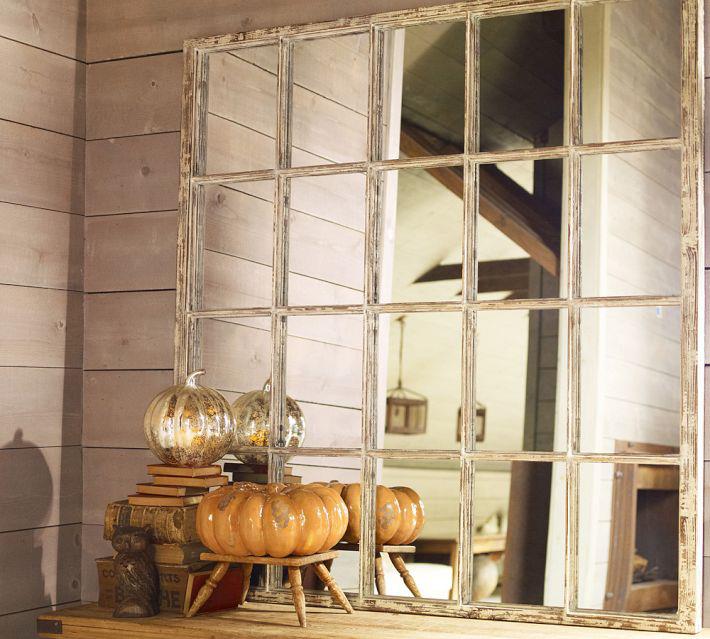
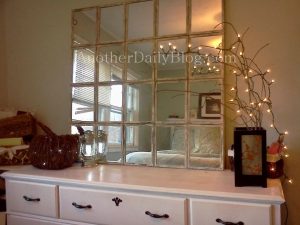
Recently, I’ve gotten really into researching different ways other PB lovers are creating DIY’s of the pieces they’re falling in love with at the mothership. Some of them are relatively intricate, and as a DIY novice, I typically steer clear of such projects. (Power tools aren’t exactly my jam.) However, when I stumbled across this White Paned Mirror DIY by Jen at Another Daily Blog, I knew confidently this was something I could tackle no problem!
First things, first. This Pottery Barn Knock-Off is dirt cheap in comparison to the real deal. In total, the finished project is only going to set you back about $30, as opposed to the $699 price tag on the designer mirror. I know what you’re thinking… less talk, more pictures. You got it- Let’s dive into Jen’s guide!
Let’s kick things off with supplies. Here’s what she says you’ll need:
* 20 framed mirrors from the Dollar Tree = $20
* Power Grab Adhesive (it dries in 10 seconds literally) – $4 at Lowe’s
* KRYLON’S Satin Ivory spray paint – $4 at Wal Mart
* Acrylic Black and White paints – About $1 at your local craft store
* A large sheet of plywood – $5 at Lowe’s
STEP 1:
– Remove Mirrors and backing from EACH frame and set aside (try not to buy the red frames b/c they DO NOT cover well, they turn pink, even with multiple coats of Krylon’s primer spray paint) I bought browns and blacks. After you disassemble each mirror spray paint with Krylon’s Satin Ivory (2 -3 coats should be fine, and you can do it in one setting)


Let them dry about 15 minutes just to be safe :))
STEP 2:
-Line all your frames on the plywood and make pencil markings, cut off excess. Once you have cut the excess off Spray Paint a light coat of the same spray paint over the board (in case any shows through) Also spray the edges of the plywood as this will show when you later hang it).

STEP 3:
– Put your mirrors back into the frames (push the tabs down to lock them in), Then put the Power Grab in a caulking gun and apply a liberal amount to the entire back side’s outer edges and in the middle of each frame (ONE AT A TIME) Line up to your plywood edge to edge/corner to corner and press FIRMLY for ten SOLID seconds on both top and bottom and again on sides. IT WILL be stuck and won’t move after this. Apply each other frame the same way. Start Horizontally with lining them and then work onward.


STEP 4:
– Squirt a small amount of black acrylic paint and a small amount of white acrylic paint onto a plate (or hefty paper), with a small foam brush dab the corner ONLY into the black paint then a small dab into the white and then another small dab of black back onto the tip. Use a swish back and forth motion in the creases and edges an random areas around the frames and pick the brush up with a swipe. This will give the frames that distressed old window look like the Pottery Barn’s White Pane Mirror 🙂

FINAL STEP:
– Obtain a heavy duty photographic hook from a framing store (or arts and crafts store in the framing section). AND HANG AND ENJOY the fact you’ve saved yourself roughly $670
Will you give this #DIY a try? Let us know in the comments below! If you decide to make your own mirror, share it with us! We would love to see your version of this super chic mirror. Send your photos to taylor@norcalhomesllc.com 🙂