Sometimes, one man’s trash, really is trash.
#DIYThursday
Sometimes, one man’s trash, really is trash.
I moved into a new house recently and have started tackling small DIY projects after work (shout out to our Chalkboard Wall Post – I’m halfway through and it’s looking great). My new roommate (a.k.a. my S/O), although incredibly good looking and extremely patient magic loan, isn’t quite as clean and organized as I am. So, a lot of my DIY’s are centered around reducing clutter and making it easier to keep things looking clean.
Every time I walk into the kitchen all I can see is the open trash can staring back at me. As if that wasn’t gross enough, it’s twin, the recycle bin, also has a home in our kitchen. After searching for new, sleeker-looking trash cans at Bed, Bath and Beyond, Target, and Kohl’s, I’ve decided the following things about said receptacles:
- They’re overpriced. Like this beautiful Rose Gold can I fell in love with at Bed, Bath & Beyond for ONE HUNDRED THIRTY DOLLARS!!! At that price we wouldn’t need it because I wouldn’t be able to afford anything to throw away.
- Since we HAVE TO have two of them, they take up a ton of space.
- There’s no way of getting around the fact that it’s still a tub of trash sitting in the house.
So, to 86 this increasingly overwhelming issue, I decided to refer to the DIY-mecca… Pinterest. That’s where I found this beauty. *Queue the harps*
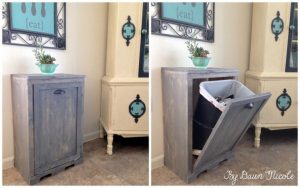
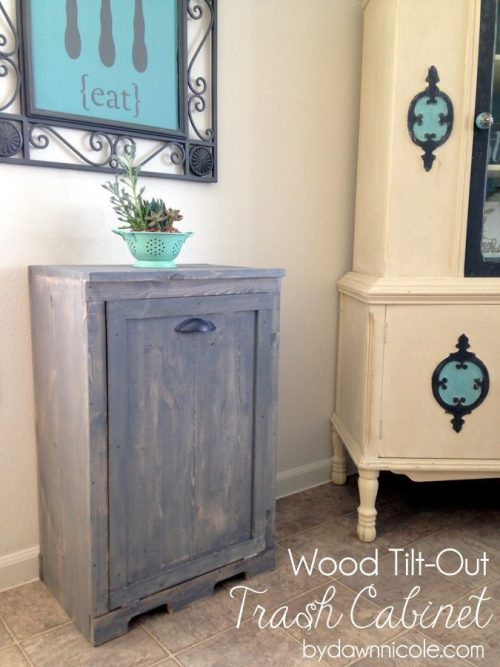
There are two things that I LOVE about this project. First, it hides the trash cans. Second, it doubles as a little side table or buffet, so the space isn’t completely unusable. I also really like how the finishes are relatively customizable. I’m getting ready to paint my cabinets white (yikes!), so this distressed grey color would be a great accent in my kitchen. However, stained natural wood will also make for a rustic and elegant option. If you’re feeling adventurous, you can even try painting it a fun color like turquoise or red! The trash can is your oyster. ?
This particular tutorial is for only one bin, but by simply doubling the length of the top board, it can easily be transformed into a two-can holder. The reason I selected this particular guide out of the HUNDREDS that are on the internet is because of the awesome diagrams that come alone with this step-by-step. It makes it pretty user friendly and reduces the chances for error. Also, since the dimensions are neatly laid out, it makes it easier for me to hand off to my “designated wood cutter” so he can prep the pieces for me. I would cut them myself but after that one time, I’m not allowed to use power tools anymore….
ANYWAYS! Below is a list of things you will need to get started.
Before you go, leave a note in the comment section letting us know what you think of this #DIY! Would you try it? Let us know! 🙂
2 – 1×12 @ 6 feet long
1 – 1×3 @ 8 feet long
2 – 1×2 @ 8 feet long
Narrow Hinges (the cheapo kind with flat headed screws)
Knob or Pull
2 inch screws
1 1/4 inch finish nails
2 inch finish nails
1-1/4″ Pocket Hole Screws
Elmer’s Wood Glue
Elmer’s Wood Filler
120 grit sandpaper
primer
wood conditioner
paint
paint brush
Now, let’s dive in! Here are the plans as laid out by Ana White on her website. Big THANK YOU to Dawn Nicole for directing us to Ms. White’s guide.
General Instructions:
Please read through the entire plan and all comments before beginning this project. It is also advisable to review the Getting Started Section. Take all necessary precautions to build safely and smartly. Work on a clean level surface, free of imperfections or debris. Always use straight boards. Check for square after each step. Always predrill holes before attaching with screws. Use glue with finish nails for a stronger hold. Wipe excess glue off bare wood for stained projects, as dried glue will not take stain. Be safe, have fun, and ask for help if you need it. Good luck!
Dimensions:
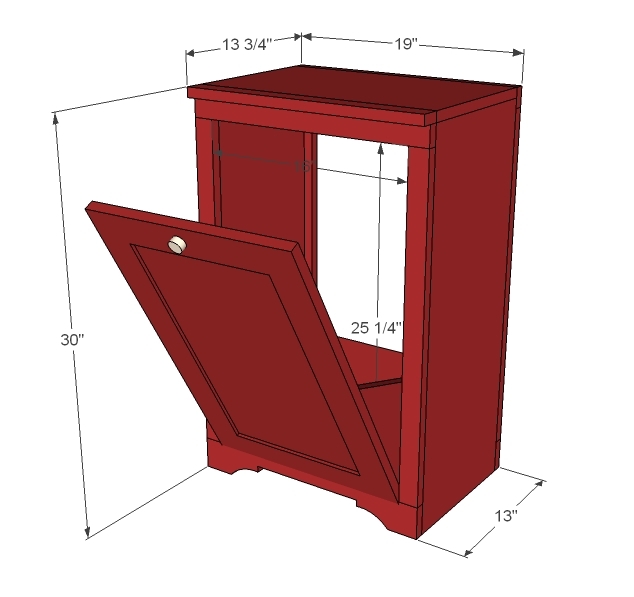
Dimensions shown above. Fits trash can less than 16″ wide x 22″ high x 12″ deep overall.
Cut List:
2 – 1×12 @ 29 1/4″
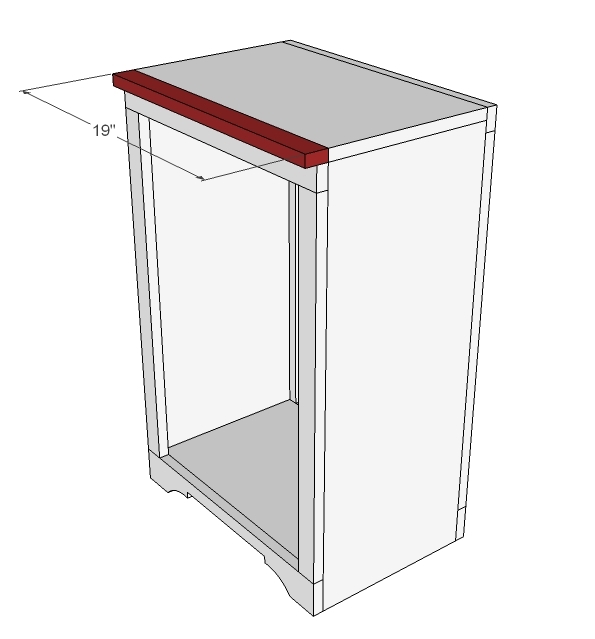
1 – 1×12 @ 19″
1 – 1×12 @ 17 1/2″
2 – 1×3 @ 19″
3 – 1×2 @ 19″
2 – 1×2 @ 26″ (Back)
2 – 1×2 @ 25 1/4″ (Front)
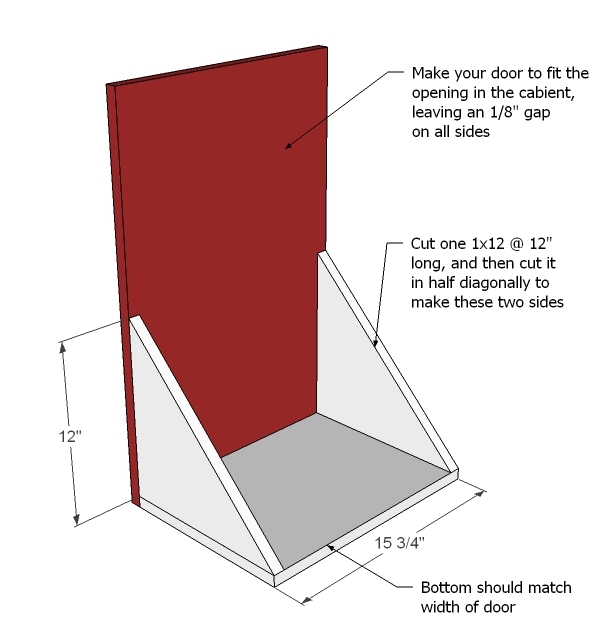
DOOR
Door Slab overall 1/4″ less than opening
1 – 1×12 @ 12″ cut in half diagonally
1 – 1×12 the width of the door (approximately 15 3/4″)

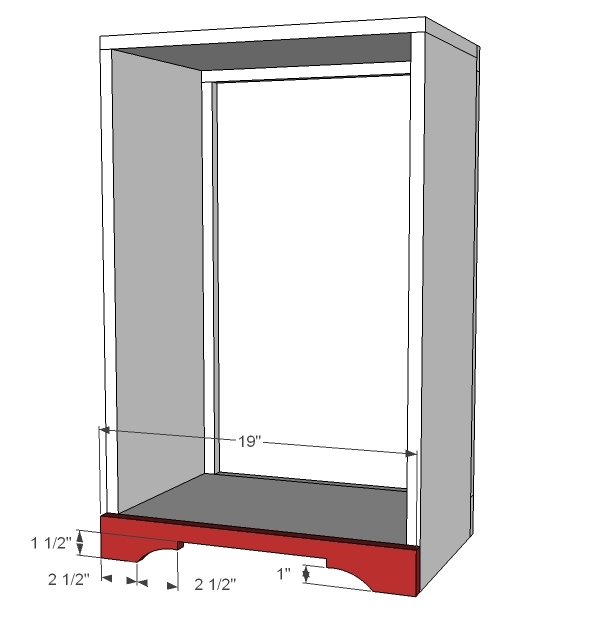
Step 1:
Use either a Kreg Jig or 2″ screws or finish nails to build your box as shown above. The bottom shelf is 2 1/2″ from the bottom, at the top. So leave 1 3/4″ gap underneath the bottom shelf. Check for square.

Step 2 Instructions:
Once your box is done, choose the less attractive side and attach trim as shown above. I used 1 1/4″ finish nails and glue.

Step 3 Instructions:
Now the sides on the back. You can also choose to cover the back in 1/4″ plywood, but I personally wanted an easy means of both changing trash bags and cleaning the cabinet out. So my trash bin is actually open on the back.
Step 4 Instructions:
Now the front. I like to cut footers out in place because you don’t have to worry about clamping it down or anything like that. Nail down and then mark as shown in the diagram (you can click images for a larger view) and cut out with a jigsaw.
Step 5 Instructions:
Now the back side trim.

Step 6 Instructions:
And the front. Notice that the top has a 3/4″ gap. This is good.
Step 7 Instructions:
Finally the front edge. Nail and glue in place. This completes the cabinet construction.
Step 8 Instructions:
I used a new technique to build a raised panel door for this project! But I’d like to get that content to you in the form of video, so please be patient – will get that tutorial posted in the next day or so.
You should always build your doors to fit your openings – especially for inset doors. For inset doors, I like to leave an 1/8″ gap around all sides of the door, so that means you need to make the door overall 1/4″ less wide and 1/4″ less tall than the opening.
You can use other methods to build the door – a full slab for a modern look or beadboard on a 1×3 frame for a cottage look.
Build the base as shown above, securing to the door.

Step 9 Instructions:
And then just hinge the door to the cabinet. For our tilt out trash cabinet/recycle center, we didn’t even have to worry about a magnetic catch – the weight of the tilt out base keeps everything closed nicely.
However, you may need to install either hardware or a chain to keep the tilt out door from opening all the way and bruising your toes 🙂
Preparation Instructions:
Fill all holes with wood filler and let dry. Apply additional coats of wood filler as needed. When wood filler is completely dry, sand the project in the direction of the wood grain with 120 grit sandpaper. Vacuum sanded project to remove sanding residue. Remove all sanding residue on work surfaces as well. Wipe project clean with damp cloth. It is always recommended to apply a test coat on a hidden area or scrap piece to ensure color evenness and adhesion. Use primer or wood conditioner as needed.