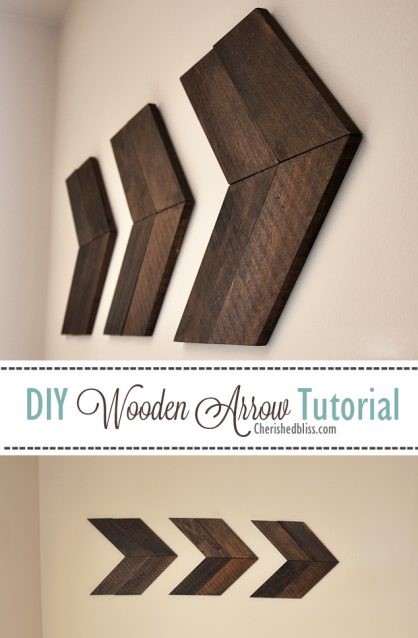

I am so so excited about this post today! I shared a little sneak peek on instagram a few weeks ago, and it seriously might be my favorite project to date. It’s just one of those that turned out exactly how you had it pictured in your head, maybe even a little better! : ) I made them for Adam’s Vintage Travel theme nursery (see my inspiration here). Are you ready for the wooden arrow tutorial?
You will be amazed how easy these are! If you’ve never done much with saws, this is a great beginner project to teach you 45 degree angles! You can do it, I promise ; )
Supplies:
– Miter Saw
– Tape Measure
– Pencil
– Right Angle
– Safety goggles
– Craft Wood or 1×4’s
– Wood Stain
– Mending Plates (1/2″ screws if it doesn’t come with them)
– Drill
Wooden Arrow Tutorial:
First thing you want to do is get your wood and figure out how long you want it. I used some craft wood I found at Home Depot that was 24″ long and just a little thinner than a 1×4, but you can just as easily use 1×4’s. Since mine were 24″ I just found the center and cut them in half. Make sure you find the center both horizontally and vertically and mark it, then you will center your 45 decree angle on that mark. In the picture below you can see where I made my marks to take advantage of the entire board.
 As you can see it took 2 24″ board to complete one arrow. Place your board in your miter saw (set to a 45 degree angle) and make your cuts. Once your done you just lay it out as shown above. Make all your cuts until you have as many arrows as you need.

Once you are done cutting go ahead and stain or paint the wood to your desired color. I used a Minwax Dark Walnut and applied it with a lint free cloth. I chose not to seal mine since they are hanging on the wall and I wanted them to have a dull finish (no shine). But that is just personal preference. Some people might argue that it has to be sealed, but since nobody will be touching these I’m not worried about it.
After they are stained, you just want to add your mending plates on the back of your arrows to keep your wood together. You can also glue it before using the mending plates to give it that extra strength, but just the mending plates worked for me. I then found the center of the entire arrow (for weight purposes) and added a saw tooth picture hanger to hang on the wall.

